3 Simple Golf Slice Cure Practice Drills
This post contains affiliate links. That means I will earn a commission if you purchase a product through certain links on this page at no additional cost to you – here’s my Affiliate Disclosure. This allows me to keep this website free of annoying ads. Please enjoy this ad free post.
Do you slice the golf ball?
Yeah, I still do too (even after years of playing).
It happens to most of us and it is VERY common! Have no fear, however, because we are going to fix that pesky little (big?) problem by the time we get to the end of this article…
What Is A Golf Slice?
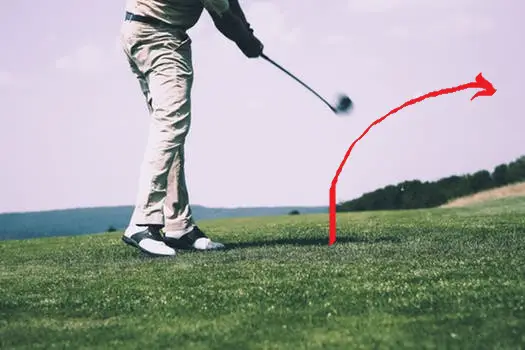
A slice is when the golf ball starts straight but ends up taking a sharp right (for right-handed golfers) in mid-flight and moves way off the center-line of where we were aiming.
In this article we are going to look at three simple drills to help beginners fix their golf slice. I’ve addressed how to correct a slice in a previous article, but today I am going to focus on the actual golf drills that I use and teach that have been most effective at helping beginning golfers to stop slicing the ball for good.
But before we even begin to investigate how to fix the golf slice, let’s find out what is causing the ball to slice in the first place.
What Causes A Golf Slice?
The golf slice is caused by having an outside-in swing path. This type of swing path causes the club to be open at impact. For a right-handed golfer, when the clubface is open at impact, it imparts a clockwise rotation onto the golf ball (i.e. the ball spins to the right). This spin causes the ball to veer right and the result is the dreaded slice.
The cure?
It’s easy to understand, then, that the cure for the slice (which results from an open club face at impact that comes from on outside-in swing path) is to have a more closed (or square) clubface at impact. When I say more closed here, I mean more closed than the open clubface that causes the slice in order for the clubface to impact the ball squarely.
I do NOT mean an actual closed clubface at impact, which will result in a hook.
The way to achieve a more closed (square) face at impact is to have a more inside-to-out swing path. And I’m not the only golfer saying this. Check out the quote below…
“…grooving an inside-out path is the most powerful no-slice secret.”
–Golf.com article on the best way to fix your slice
The simple golf practice drills below are all aimed at creating a more inside-out swing path because learning to swing the golf club in this fashion will present a more closed (square) clubface at impact and eliminate the cause of your golf slice in the first place.
Golf Slice Practice Drill #1 – The Basket Drill
The first drill is probably the easiest and most effective for ninety percent of golfers who have an outside-in swing path and need to correct it.
Items needed: 6 Iron or longer club (driver is a good choice), but any club with decent length will work, golf ball, some type of object that is about 12″ – 18″ high and isn’t too hard (range basket is fine). I’ve actually used an empty shoe box.
Step 1) Set up your golf ball on a tee (if using your driver) or on the ground if using an iron.
Step 2) Place the range basket or shoe box on it’s short end roughly 18 inches behind the golf ball, but make sure that it is NOT directly in line with the golf ball. You want the object a little bit outside the target line. See the picture below.

Step 3) Swing your club in a manner that will cause you to miss the basket (or shoe box), but contact the ball as best you can.
At first, this is going to feel a little weird because you will spend the majority of your time focusing on the object that is behind the ball so that you don’t hit it.
Over time it will become second nature to miss the object and just focus on the golf ball. What you will see is that as you start to focus less on missing the object and more on hitting the golf ball, the ball will start to fly straighter and without the slice-imparting clockwise spin that used to come from your outside-in swing path.
Why This Works
This golf drill eliminates the slice because the placement of the object a short distance behind the ball forces you to maintain an inside-out swing path. In order to NOT hit the basket or shoe box or whatever object you decide to use, it will be necessary for you to swing more inside-to-outside.
You’ll start to keep your right elbow (for right-handed golfers) tucked more into or against your body which will prevent the ‘over the top’ move that some golfers have when the right elbow extends away from your body during the transition from backswing to downswing.
This over-the-top move is one of the main causes of the slice because it results in the clubface coming across the ball from the outside, which imparts clockwise spin onto the ball. This type of spin is what causes the slice.
While there are many other golf swing drills that are effective for correcting the outside-in swing path, the placement of an object behind the ball is really the key to this particular exercise. Since you are trying to not hit the object you will subconsciously bring your right elbow in, which eliminates the over-the-top movement in your swing and, effectively, creates the desired inside-to-out swing path.
In essence, this drill prevents the swing ‘problem’ that causes the slice in the first place. Learning how to fix an over the top golf swing takes a bit of practice, but with this drill you will be well on your way to fixing THE major swing flaw that is causing you to slice the golf ball.
Golf Slice Practice Drill #2 – Rubber Tee in Golf Glove Drill
Items needed: 6 Iron or longer club, golf glove, rubber golf tee (like the kind you find at the golf range), golf ball.
Step 1) Pick up the rubber golf tee from under the golf mat and place it inside your golf glove so that the flat part (base) of the tee rests against the top of your lead hand and the tee portion extends outward from your gloved golf hand. See the picture below:
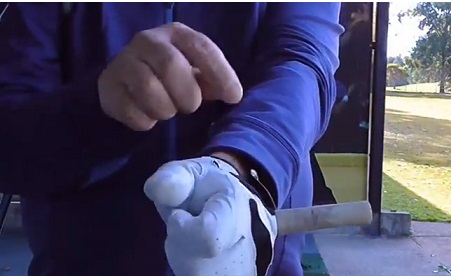
Secure the base of the tee against the top of your hand by placing it inside your golf glove and then tightening your glove as shown in the picture. The long narrow part of the rubber tee should be perpendicular to the top of your hand (as shown).
Step 2) Get in position at address and take the golf club back slowly. As if in slow motion, begin your downswing towards the golf ball, but take note of WHERE the tee in your golf glove of your lead hand is pointing as you are about to impact the golf ball.
 WRONG!!!!
As you can see from the direction of the tee extending from the golfer’s glove, above, the direction of the tee is to the right. This means that the CLUB FACE IS OPEN and impacting the golf ball at this angle will cause a slice. The flight path of the ball will be towards where the golfer is pointing (to the right). This is WRONG.
Step 3) Ask yourself WHAT it is about YOUR swing that is causing this position at impact. Basically, you need to answer WHY your tee may be pointing to the right. Some common reasons for this are: hands not turning over soon enough, over-the-top golf swing, or outside-in swing path.
For most golfers, the problem is usually that the hands are not turning over soon enough or the outside-in swing path that results from this.
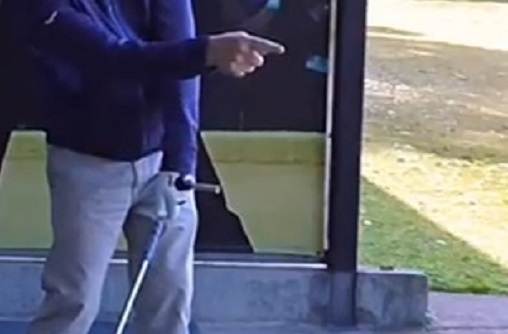
Step 4) FIX whatever it is about your swing path in order to achieve the tee pointing directly down the target line as shown below.
![]()
RIGHT!!!!!!
At impact, the tee should be pointing straight down the target line as shown in the picture above and NOT out the the right. When the tee is pointing directly down the target line, this means that the club face is perfectly square at impact. And a square clubface at impact is the most important part of a good golf shot.
As your hands turn over through impact it is perfectly fine (and natural) if you end up with the tee pointing somewhere out to the left. The important takeaway here is that the tee in your lead (gloved) hand should be pointing STRAIGHT down the target line at the point your club face contacts the golf ball.
Why This Works
This golf drill is extremely effective because the feedback from actually seeing where the golf tee in your lead hand is pointing is immediate and very visual.You will know exactly what you are doing wrong and it will become very apparent WHAT you need to correct in order to achieve a tee that is pointing straight through impact.
This drill connects what the club is doing to what the golfer is doing and it’s illustrative of what is causing a golfer’s slice. It also provides an easily achievable goal (i.e. get the tee in your gloved hand to point straight down the target line) that anyone can see and understand. This drill provides effective visual cues to help the beginning golfer understand the right way to swing a golf club.
Golf Slice Practice Drill #3 – Clockwise Loop Drill (Video)
For our final golf slice practice drill, I thought I’d include a video. This drill is not difficult to execute, but it’s slightly tougher to explain and a video will make it very simple to understand. This drill is being taught by Hank Haney – one of the foremost golf instructors who has taught many of today’s touring PGA pros – in conjunction with GolfDigest.com.
Items Needed: Golf club (preferably driver), golf ball.
Why This Works
This drill works because it demonstrates how to counteract an over-the-top golf swing. By simply swinging the golf club in looping, clockwise, rotations this simple practice drill teaches a golfer’s muscle memory to swing the club on a flatter and more inside-to-out plane.
The motion in the first part of this exercise negates the over-the-top swing that ninety percent of amateur golfers have that is directly responsible for their slice. It’s simple and effective. It works.
Conclusion
So there you have it – 3 simple golf slice practice drills – none of which takes more than five minutes (max) and all of which will eliminate your slice once and for all. Each of these exercises is extremely effective at doing what it’s supposed to, but some golfers will respond better to the Basket Drill, some will prefer the Golf Tee in Glove Drill, and for others, The Clockwise Loop Drill will resonate.
Regardless of which one of the practice drills you prefer or find most effective at curing YOUR slice, I hope that you have learned something that you can use to help you become a better golfer.
Happy Golfing!

How to Cure a Slice in Golf – The Correct Way!
Mistakes Every Beginning Golfer Makes (And How to Fix Them)